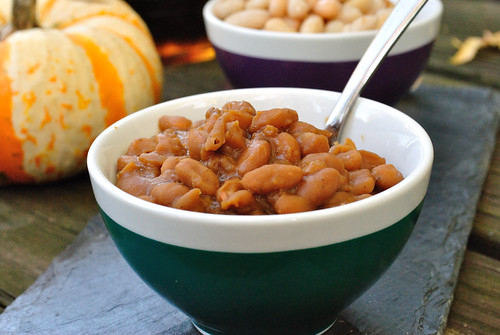
Coconut Lime Roasted Chickpeas

It’s been one of those weeks that seems to crawl by at the speed of light – the days go quickly but I wake up expecting it to be Friday when the calendar says Tuesday.  I’ve been spending a lot of time at a desk due to my full-time job and the void that is photo editing so suffice it to say, my diet hasn’t been as stellar as I would like.

DSC_0046_505edit1

My workday meals are  great since I pack all of my food in advance and dinner is also good.  My downfall is the time between when I come home from work and when I eat dinner. I get stuck in a snack rut of an apple + peanut butter or edamame since I like snacks that are protein rich, quick, and require little prep. On top of that, I usually can’t decide if I want something sweet, something salty, or something savory.  Yesterday I finally found something, other than salted chocolate, that solves that problem and fits my snack requirements.

DSC_0012_503edit2

Enter roasted chickpeas. They’re not new, the blog world has been buzzing with them for awhile now.  They’re not fancy, after all, it’s just a humble legume.  But they are most definitely are amazing.  During a particular fit of indecisiveness (who am I kidding – I’m just incredibly indecisive all the time), I decided to change up my usual roasted chickpeas and give them a flavor boost.  Healthy coconut oil gives them a faint sweetness while lime juice and zest give them a bright, energizing flavor.  Give them a sprinkle of good sea salt and it’s salty, sweet, sour, crunchy bliss.

DSC_0005_502edit1
Coconut Lime Roasted Chickpeas
Yield: depends on serving size

1 cup chickpeas, patted dry
2 Tbsp. fresh lime juice
1 Tbsp. coconut oil, melted
zest of one lime
sea salt

1. Preheat oven to 375Fand line a baking sheet with foil.
2. Using a paper towel, pat your chickpeas dry. In a medium bowl, toss chickpeas together with melted coconut oil, lime juice and lime zest. Spread evenly on your baking sheet.
3. Roast for 15-25 minutes – it’s a bit of range but I find that it really depends on your oven. Turn your baking sheet half way through and giving them a quick shake to move them around. Shake a few more times if you oven has hot spots.
4. Let cool and store in an airtight container.

Meatless Monday: Vegan Recipe Round-Up

I hope everyone had a great weekend! Did anyone do anything fun for the Superbowl? I had a fairly busy weekend so by the time Sunday night rolled around, I was ready to crash.  The husband and I went to grab some pho and beer with my parents and then called it an early night. We’re super exciting people, I know.

This week I thought I would do something new and institute a new fixture on the blog: “Meatless Mondays”. I’m not a vegan or vegetarian but I do prefer to limit my intake of animal products for various health and environmental reasons so I think this feature will be a good way to come up with some new exciting recipes. For this week, I’m going to do a quick recipe round-up of some of my favorite vegan and gluten-free recipes.

_13872_369edit1
Vegan Mexican Hot Chocolate: The most decadent hot chocolate ever

_12813_321edit1
Vegan Chocolate Cranberry Date Bars: These are a great post-workout snack

_12010_290edit1
Vegan Cranberry Coconut Truffles: I like to keep a steady supply of these on hand for quick grab-and-go snacks

Vegan Split Pea Soup: A hearty vegan soup for cold winter nights

_7766_055
Vegan Chai Banana Bread: My favorite banana bread!

Vegan Stuffed Shells: The husband ate a few servings of these before I told him they were vegan…and then he kept on eating!

Moroccan Inspired Vegan Pasta Salad: One of my favorite summertime pasta salads.

Feel free to link up to your own recipes or other great recipes/blogs/etc/ in the comments!

Vegan Salted Mexican Hot Chocolate

*If you’re in Richmond, VA check out the article I wrote for Richmond.com about gluten-free friendly restaurants in Richmond. Check out the comments for even more g-free friendly places! Keep the comments and the recommendations coming!*

Virginia has decided to fully embrace winter – freezing winds and all.  I love the cold but have a strong hate for wind.  Especially cold wind (I just typed wine. Clearly, I have my priorities in order) – it just seems to cut right through me and cause me to have perpetually frozen fingers and toes. Despite the fact that I’m pretty sure I need to invent a nose-warmer, this chill has a lovely silver lining.  And that would be hot chocolate.  Velvety, silky, insanely rich vegan hot chocolate to be exact.

_13878_370edit1

I grew up drinking the Abuelita mexican hot chocolate and quickly fell in love with the spicy + sweet chocolate combo. Rather than buy the processed stuff, I decided to make my own.  I took the spicy flavors of Abuelita, added in my love for all things salty + sweet and poured it all into a mug.  It is truly drinkable chocolate decadence.

_13885_371edit1

And if you’re feeling extra sassy, add in a shot of bourbon. And then top it with vegan (or real, if you prefer) whipped cream so it melts into the hot chocolate. It’s gonna get messy. Do it, it’s only right.
Full disclosure: the whipped cream in the photo is the real stuff. I stay away from milk & cream most of the time, but I just can’t resist homemade whipped cream! For a full vegan version – sub your favorite vegan whipped cream.

_13872_369edit1

Salted Vegan Mexican Hot Chocolate
Yields: 2  large servings or 4 smaller servings (it’s rich stuff, so you can get away with a smaller portion)

2 cups vanilla soy milk
1/2 cup vegan chocolate chips or chopped chocolate (use the good stuff)
1 tsp. ground cinnamon
1/4-1/2 tsp. ground cayenne (adjust to your spicy liking)
1 tsp. vanilla extract
1/4 tsp. + a pinch for serving, good quality flaky sea salt, sel gris, or fleur de sel

1. Heat soy milk in a saucepan over medium-low heat until it just barely begins to steam and simmer. Stir it occasionally to keep a skin from forming.
2. Add chocolate and whisk constantly until chocolate is melted.
3. Add remaining ingredients, whisking to combine.
4. Let simmer for 2-3 minutes until the mixture is hot.
5. If you’re adding booze, do it here. Shut off the heat and serve immediately.  Make sure to sprinkle an extra pinch of salt on top. Yum.

Lentil Soup

I hope everyone had a great weekend! Mine was filled with

recipe testing

wine and photos

and playing with this crazy girl.

I was also able to catch up on a lot of house and general life stuff that I needed to get organized. Getting back into the swing of things after being off of work for two weeks is tough, but I’m feeling like I’m back in my routine this week. Despite the fact that Richmond is clearly having some cold-weather commitment issues,  it is actually starting to feel like winter here! In fact, there were a few days this past week that were downright freezing – and I loved every second of it. Having grown up in a place where the seasons range from hot to slightly less hot, I’m all about the winter chill. Bring on the snow days, hot buttered rum, and chili! Beside the rum and the snow, one of my favorite things about the winter is winter food, especially soup.  I make soup pretty much every week and never get tired of it since there are so many different types to try – there are Asian inspired soups, classics like chicken noodle soup, and one of my favorites, lentil soup.

I could eat lentil soup every day for the next few months and not grow tired of it. There are several variations on lentil soup ranging from Italian inspired to spicy Moroccan renditions and this soup falls somewhere in between. It’s tomato-based but full of fresh ginger and warm spices, which make it the perfect lunch or dinner on a cold or you know, 55 degree, winter day.  This recipe makes an extremely large batch, so consider portion out some for the rest of the week and freezing the rest for later. You will be glad you did!

_13133_331

Lentil Soup

Yields: 10-12 servings. It’s great to freeze! And it’s vegan!

2 Tbsp. olive oil

1 large onion, diced

3 large garlic cloves, minced

2 Tbsp. fresh ginger, minced

1 ½ cups carrots (about 3 large), sliced

2 cups lentils, cooked and cooled

1 28oz. can fire roasted diced tomatoes

16 oz. fire roasted crushed tomatoes (1/2 of a large can)

8 cups water (you can replace some water with vegetable stock – highly encouraged!)

2 bay leaves

3 cups kale leaves, de-stemmed and sliced into ribbons

½ tsp. allspice

1 tsp. cumin

salt + pepper

1. Cook your lentils according to package instructions. Drain and set aside to cool.

2. In a very large soup pot, heat up olive oil over medium heat and add onions. Saute for about 5 minutes until just transculent – don’t let them brown..

3. Add garlic and ginger. Saute another 3-5 minutes until fragrant.

4. Add carrots.  Sprinkle vegetables with salt and cover pot with lid. Cook, stirring occasionally for about 10 minutes until they vegetables are slightly soft.

5. Add diced and crushed tomatoes, lentils, bay leaves, spices, and lentils to pot.  Add water or vegetable broth.

6. Bring to a boil, then reduce to a simmer. Simmer very slowly for about 1 hour.

7. Add kale leaves and simmer another 10-15 minutes.

8. Add salt and pepper to taste.

9. Serve with a drizzle of good olive oil, a dollop of plain yogurt, or anything else you wish!

Vegan Chocolate Cranberry Date Bars

I’m a planner by nature (in case you couldn’t tell) so it’s no surprise that one of my favorite ways to set myself up for a healthy week is to prep healthy snacks and meals for the week ahead. We will get into this more tomorrow, but I think that planning and preparation are some of the key things that can help you stick to weight loss and healthy eating goals.  It’s difficult to make food for your entire day between work, workouts, and Netflix episodes marathons (let’s be honest) so having something healthy that you can quickly grab is incredibly helpful.

_12757_320edit1

I like to try something new every once awhile so this week, I decided to make some energy bars.  The husband and I both love Larabars so I set out to make a DIY version of our favorite snack bar. These chocolate cranberry date bars, which are similar to these energy truffles, are a great under 200 calorie snack to have pre or post-workout or when you need a quick snack. They are packed with good stuff like dates and walnuts and definitely taste like a treat.  They have a texture and taste similar to a Larabar, only they don’t cost $2-$3 a bar. Healthy, quick, and cheap? That’s my kind of snack.

_12813_321edit1

Chocolate Cranberry Date Bars
Inspired by: Elana’s Pantry and my energy truffles
Yields: 15-16 bars

15 medjool dates, pitted
2 cups walnuts
1/2 cup dried unsweetened cranberries
4 Tbsp. cocoa powder
1/4 tsp. almond extract (optional but it is really tasty)
1/2 tsp. ground cinnamon
pinch of fine sea salt

1.  Add walnuts to food processor and process until you have medium sized crumbs.  Don’t process too long!
2. Remove walnuts from food processor and set aside.
3. Add dates to processor and process until you have small, sticky chunks.
4. Add cranberries and pulse a few times to combine with the dates.
5. Add walnuts to date mixture and pulse to incorporate.
6. Add cocoa powder, almond extract, cinnamon, and salt and process until the mixture forms a ball.
7. Press mixture into an 8 x 8 pan lined with plastic wrap or parchment paper.  If you don’t have a 8×8 pan, use a large casserole dish and simply form the mixture into an approximate 8×8 square with your hands.
8. Freeze for an hour, or until firm.  Then simply cut into bars and store either in the fridge or freezer. If you’re taking them to go, simply put in a bag or wrap in parchment paper to keep them from getting too sticky!

Vegan Cranberry Coconut Energy Truffles

I can’t believe that Christmas is only five days away! It seems like every year the holiday season flies exponentially faster than the previous year. This means that each year, my Christmas shopping gets pushed further back and my to-do list grows longer. In fact, I just started Christmas shopping yesterday – oops! While this December time-warp has had it’s disadvantages (um, that baking list? Yeah, totally didn’t get through it), there has been one advantage – the six weeks of boot wearing flew by and now, I am boot free! I am the proud owner a new pair of both left AND right shoes and I can finally start to resume some semi-normal activities. I’m still on a lengthy list of restrictions (no walking, running, jumping, or high-impact cardio) and I have to wear some sort of supportive and confining clog/shoe, but it’s definitely better than the boot. There is a still a long road ahead before I can start running again, but for the moment, I’m focusing on what I can do and trying to make progress in other areas. Being boot-less is definitely a nice little Christmas gift – thanks doc.

Who knew wearing two shoes would be so exciting?!

Speaking of gifts, I had grand plans to make all of these adorable and tasty DIY gifts for everyone this year. What happened? Between the after-wedding insanity, work, and my foot injury, time got away from me and my plan to make tons of DIY gifts didn’t happen. I will probably whip up a few DIY treats for some family members but other than that, I don’t foresee too much gift-making happening. This may be a good thing because I’m really starting to feel baked and sugared-out. Based on some recent posts in the blog world, I have a sneaking suspicion that a lot of others share the feeling.

_12027_287edit1

_12010_290edit1

While I love sweet things, I’m not too crazy about refined sugar. For me, I find that consuming too much refined sugar makes me feel bloated, my skin breaks out, and I’m left in a perpetual cycle of heart-beating-out-of-chest racy and face-plant-on-nearest-semisoft-object exhausted. Instead of sugar, I prefer to use natural sweeteners like honey and maple syrup. Also, I recently discovered that I love Medjool dates. They may sound strange, but give them a try before you write them off. Dates are naturally sweet, really good for you, and make the perfect base for energy-revving truffles (no, not boozy chocolate ones). I whipped up these cranberry coconut energy truffles during a fit of weekend productivity and I’m so glad I did! They’re packed full of good for you things like dates, walnuts, and coconut, which make them a perfect 100-calorie pre-workout or mid-day energizing snack (you can calculate the calorie count based on your ingredients using this website). Now, I’m going to grab one of these truffles and start ticking off my Christmas shopping list, wish me luck!

_12042_289edit1

Vegan Cranberry Coconut Energy Truffles

Inspired by the Edible Perspective

Yield: about 20 truffles

These energy truffles will help you power through a tough workout, an equally tough marathon of last-minute Christmas shopping, and make a nice gift for a health and fitness focused friend (just make sure you tell them to refrigerate or freeze!).

10-12 medjool dates, pitted

½ cup naturally sweetened, dried cranberries

1 cup raw walnuts

¼ cup unsweetened shredded coconut

1 Tbsp. creamy vegan peanut butter

1 teaspoon vanilla extract

¼ tsp. fine sea salt

1. Remove pits from dates by carefully slicing down the center with a small knife and nudging out the pit. Set pitted dates aside.

2. Put walnuts in food processor and pulse a few times until you have small walnut crumbs. Don’t let it run too long or you will have walnut butter, which is tasty, but not what we’re after.

3. Remove walnuts to a small bowl.

4. Put dates in food processor and process until they are in very small, sticky pieces.

5. Add the walnuts back to the food processor. Process walnut-date mixture until incorporated.

6. Add in remaining ingredients and process until completely blended and firm enough to form a ball. I started with 10 dates and ended up adding 2 more (just remove mix, process dates, and add back to mixture) to firm them up a bit.

7. Make small, ping pong sized balls by rolling the mixture between your hands.

8. You can roll the finished truffles in shredded coconut if you would like. Store energy truffles in the fridge or the freezer in an airtight container for a grab-and-go snack.
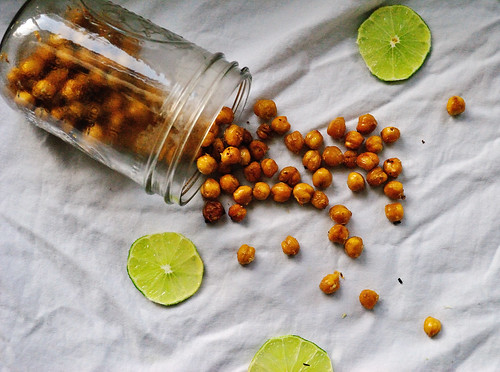
Vegan Sweet Maple Baked Beans

The first week of marriage has come and gone and I have to say – it’s pretty awesome. Nothing feels that different – we already lived together – but we are experiencing a time where the journey of our lives is really coming to fruition.  There are some exciting things happening in our future and being married only makes us more excited for these changes.  While we have definitely been experiencing newlywed bliss, this week has also brought us back to reality.  There was laundry to be done (I swear it doesn’t end), many generous gifts to be unwrapped and put away in our small apartment, bills to be paid, and schedules to coordinate. It’s been a busy week, to say the least.

_9333_174

Between putting gifts away, organizing the wedding gear that we brought home, and actually taking a day or two to fully relax, we haven’t done much cooking or entertaining.  After the hectic week back to reality, we had a fun and relaxing weekend that involved celebrating our one week of marriage and also celebrating my mom and stepdad’s 7th anniversary.  On Sunday, we took my family out to an amazing brunch at a restaurant that is quickly becoming our favorite, The Roosevelt.  This restaurant deserves a full-scale write up but let’s just say that any place that roasts apples in bacon fat and allows you to order a side of foie gras with brunch is a little like heaven.  After our ultra indulgent brunch, we parted ways to do some errands and then we had my family over for a cozy late-night fall dinner to break in our new grill (Thank you Ann! You can’t imagine how excited Brad is about it!).

_9297_172

We decided on a very simple and easy menu of grilled hot dogs (with g-free buns that Brad found!), grilled asparagus, fresh g-free apple crisp, and homemade baked beans.  I volunteered to make the baked beans even though I have never made baked beans in my life.  My only goals for these baked beans were that they be: a.) edible – you know, just a mildly important thing; b.) sweet – I like baked beans that are maple kissed; and c.) meat free – after brunch, the thought of bacon actually hurt my arteries a bit.  Oh yeah, did I mention they needed to be ready in 3 hours?   After researching a few recipes, I got to work and made some of the most satisfying baked beans I have ever had.

It was a dead simple and easy process to turn those little boring white beans into something truly delicious. Then again, maple syrup makes everything (even brussel sprouts) delicious. Even Brad, with his undying love for all things pork and bacon, said they were best baked beans he has ever eaten.  I don’t think he’s lying seeing as how the leftovers are nearly gone today.

_9373_176

These baked beans are vegan, sweet, and have a lovely hearty texture that makes them perfect for crisp evenings or football filled Sundays.  They make a great side dish for fall grilling and would be wonderful with this gluten-free cornbread.   Their a bit healthier than traditional baked beans however, if you like bacon, adding in some smoked bacon would be delicious. I recommend making the full batch because they will go quickly and before you know it, your husband will be asking you to make more.

_9330_173

Vegan Sweet Maple Baked Beans

Yields: 6 servings (ish)

Adapted from: Oh She Glows

 3 cans white beans, drained and rinsed

2 cups water

1 medium onion, small dice

2 Tbsp canola oil

4 Tbsp. blackstrap molasses

1 Tbsp. brown sugar

3 Tbsp. pure maple syrup

1 Tbsp. Dijon mustard

2 Tbsp. apple cider vinegar

1 tsp. garlic powder

salt + pepper to taste

1. Heat canola oil in a large heavy bottomed pot over medium heat.  Once hot, add onions and saute until translucent.

2. Add garlic remaining ingredients (minus salt and pepper) and stir to combine.

3. Cover pot. Cook over low heat for 3 hours or until your desired consistency is reached. Stir frequently to keep from burning. You want the heat to be low enough for a very slow simmer.

4. Add salt and pepper and serve!

Vegan Split Pea Soup

The wedding is only a MONTH away (well, technically 29 days today!) so everyday has been jam packed with wedding tasks.  Between work, wedding, workouts, and trying to keep my apartment in a somewhat decent state (what mountain of laundry?), cooking dinner hasn’t been much of a priority. Normally, I make a different meal each night that yields no leftovers or perhaps, just enough leftovers for lunch the following day. I get bored with dinner foods pretty easily so I like to change it up. breakfast and lunch on the other hand, are a different story that involve pumpkin pie oats, green smoothies, and spinach salad.   Needless to say, a new meal each night hasn’t been happening lately.

Between a trip to Vegas, very few hours of sleep, and a very bare fridge my meal innovation is lacking and dinner has been an afterthought. I tend to wait to the last minute and our options seem to dwindle as the hours tick by. We could always go out to eat or pick something up, but it’s pretty difficult with the whole gluten-free thing and we are trying to save as much money as possible for the wedding.  Luckily, it’s soup season. Soup has been a lifesaver for me these past couple of weeks, and if my calendar is any indication, it will continue to be my go-to meal for the next few weeks.  On the weekends, I’ve been making more freezer friendly and leftover friendly meals to last us through the week, like this delicious vegan split pea soup.

I love split pea soup even though it is terribly difficult to photography and brings back memories of a certain demon possession horror flicks. It’s hearty enough to keep me full, has a super short ingredient list, and is a cinch to make. It’s also inexpensive and makes fantastic leftovers. This particular split pea soup recipe is from Hiedi over at 101 Cookbooks.  If you have never checked out her blog or cookbooks, you should. She makes delicious, healthy meals that are simple and satisfying.  As much as I wish I could say that I added my own twist to her soup and made it something spectacular, I didn’t.  This soup is pretty much perfect on it’s own and I wouldn’t change a thing. Go check out her recipe and instructions and make a batch to enjoy all week long.


Vegan Split Pea Soup

Check out her blog for recipe and instructions! Recipe here: 101 Cookbooks

I followed the recipe very closely but did make a few minor tweaks:

– I added two peeled smashed garlic cloves and a bay leaf to the water while the peas were cooking. I removed the bay leaf but kept the garlic cloves when pureeing the soup.

– I used one medium red onion instead of 2 small white onions just because that’s what I had on hand. It gave the soup a wonderful depth.

– I recommend garnishing with the olive oil and smoked paprika. It’s truly delightful.

Orange Tempeh Sitr Fry

Life is busy right now.  My phone is ringing off the (nonexistent) hook with wedding things, I’ve been organizing and making Excel spreadsheets for every aspect of the wedding (my life is brought to you by Excel), and I’m working on ramping up for training for my 10k. Needless to say, this week has been all about fast and easy meals. Actually, it is pretty much always about fast and easy meals for me. I’m heading to Vegas on Friday for my bachelorette party (!!!!!) so healthy meals are key this week (really they are key every week).  I need to save my calories for the many, many martinis I’m sure I will consume this weekend (kidding abotu saving calories…not kidding about the martinis though!). This is one of my favorite fast and easy meals because it keeps me full for hours, is super quick to cook up, and makes awesome leftovers. I haven’t made it in awhile and don’t remember why I never posted about it the first time I made it so I figured, better late than never!. I can’t claim credit for this recipe – that goes to the hilarious and wonderful Mama Pea over at Peas and Thank You.  Try it out for a busy weeknight and enjoy the leftovers all week long!


I hope everyone has a good rest of the week and weekend!! I will be in Vegas all weekend with my bridesmaids engaging in many shenanigans. Recap to come next week!!

P.S. I’m thinking of including more life/fitness topics on the blog – would anyone be interested???

Gluten-free Vegan Orange Tempeh Stir-Fry

Yields: 4-6 servings

Adapted from: Peas and Thank You

1 package of gluten-free tempeh (Make sure you check the label! Roasted tofu is also really great in this recipe)

3/4 c. orange juice

2 tsp. fresh ginger, grated

1 Tbsp. gluten-free soy sauce or tamari

1 tsp. sesame oil

2 small cloves minced garlic

4 cups cooked brown rice (or quinoa!)

your choice of veggies. Here are some of my favorites:

-broccoli

– carrots

-tomatoes

-peas

pickled green beans

1. Prep all of your veggies!

2. Grate or crumble tempeh into a large non-stick skillet over medium heat. Cook for 5-7 minutes until it’s nice and toasted.

3. Whisk together remaining ingredients (minus veggies and rice) in a small bowl.  If you like a thicker sauce, you can whisk in 1 Tbsp. of cornstarch.

4. Crank up the heat to high. You want that pan super hot! Add your veggies to your tempeh and stir fry until just cooked through.

5. Add sauce to stir-fry and cook for another minute or two, just so the sauce thickens slightly.

6. Serve over brown rice or other grain and garnish with some fresh thai basil.

G-free Vegan Chai Banana Bread

The weather has finally caught up with my insistent demands for the fall season and it looks like there is cool, crisp weekend in store.  I also have a very, very busy weekend to follow my very busy week which means that I needed to do some serious make-ahead, grab-and-go food for the weekend.  I already whipped up a large pot of vegetable soup this week that has been my lunch every day this week (and I still have a large container left in the fridge and four individual servings frozen).  I had planned on posting that recipe since it is really tasty but then wedding planning took over my life, my pup got very very sick, and work came home with me nearly every day so it didn’t happen. The chaos of this month and the impending chaos of next month has worn me out. To say that I need something comforting is an understatement.

_7766_055

Apparently, my body is interpreting this as a craving for a thick slice of quick bread with butter. I didn’t do much baking this summer, and now all I want to do is bake – I’m blaming it on the cooler weather. After making these pumpkin whoopie pies last week, I’ve had all sorts of baked goods on the brain. Pinterest is only adding fuel to this fire and making me wish I could spend days in the kitchen. The other day, while furiously pinning gorgeous dresses and boots that I’m pretty sure I need, I saw a picture of a humble loaf of banana bread. After that, I could not get banana bread out of my head. Luckily, there have been a small batch of ever ripening bananas staring at me for a few days and I figured baking some banana bread would put them to good use.

_7733_056

Banana bread has always been a favorite of mine for so many reasons.  For one, it makes your house smell ah-mazing.  Secondly, it is the perfect vehicle for butter, nut butters, and cream cheese (if you haven’t tried that, do it. now. It’s life-changing).  Thirdly, it makes an awesome grab-and-go breakfast on hectic fall days. But my top reason? It reminds me of baking with my mom.  My mom and I would always make the best banana bread together and I can’t help but smile when I make it. Just the smell of banana bread is enough to send me into nostalgia land and provides a warm, buttery blanket of comfort for me.  So if you need some comfort or just a quick grab-and-go breakfast for your hectic weekend, whip up some banana bread. This bread is sprinkled with a bit of chai spices that take the comfort to a whole new level. It’s also vegan simply because my favorite banana bread recipe just so happens to be vegan.

_7709_052

Gluten-free Vegan Chai Banana Bread

Yields: 1 loaf

Adapted from:Joy the Baker

3 very ripe bananas, mashed

2 tsp. vanilla extract

1/2 c. raw sugar (brown sugar or sucanat would work too!)

1 Tbsp. maple syrup

1/4 c. coconut oil (solid, very lightly packed. You can also use canola oil)

280g gluten-free flour mix

1 tsp. baking powder

1 tsp. pumpkin pie spice

1/2 tsp. allspice

1 tsp. powdered ginger (you can also do 1/2 tsp. ginger and 1/2 tsp. ground cloves if you like)

1/2 tsp. salt

1. Preheat oven to 350F and oil your loaf pan.

2. Mash bananas until they are very liquidy. Add in vanilla, sugar, syrup, and coconut oil.  Whisk until combined.

3. In a separate bowl, add remaining dry ingredients (flour, spices, salt) and whisk together until they are fully incorporated.

4. Combine wet and dry ingredients until just mixed.

5. Bake in loaf pan for 45-50 min until toothpick inserted comes out clean.

6. Let cool on a cooling rack for 20-30 minutes before removing from loaf pan.  Once removed, let cool completely before slicing.